
Apple Galette · Brisée Dough, Cinnamon, Local Honey
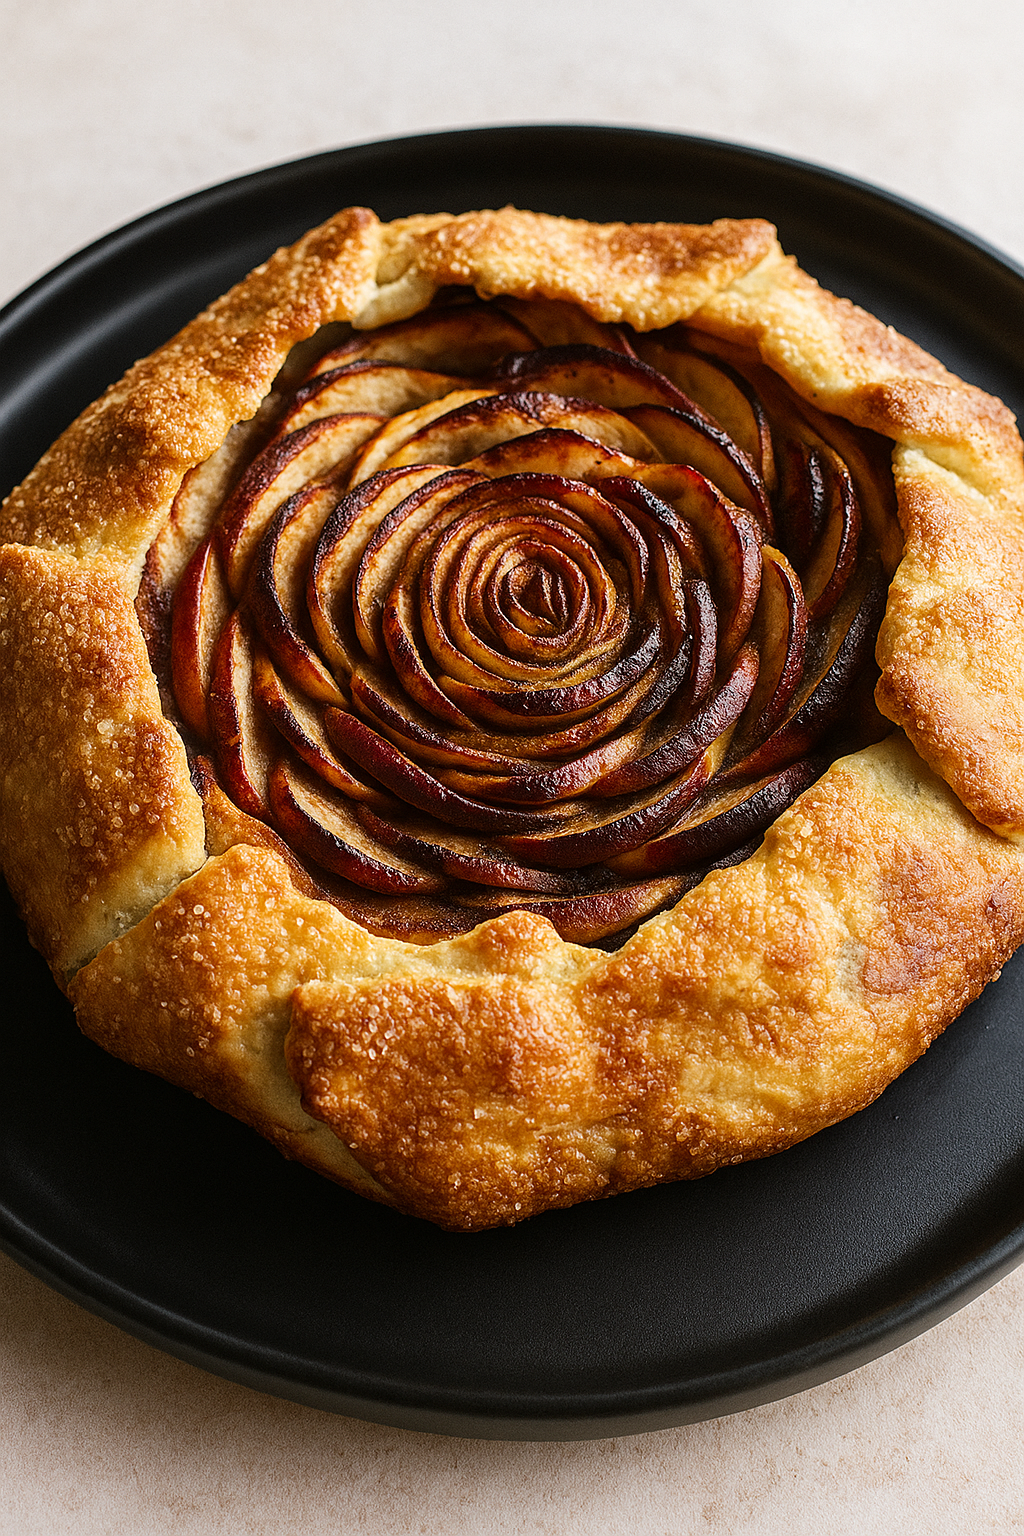
An apple galette is a rustic, free-form tart – all the elegance of a French pastry without the fussiness of a pie pan. Thin slices of apple get arranged in a tight spiral pattern that looks like a rose, tucked into buttery brisée dough, and baked until the crust is golden and flaky and the apples are tender and caramelized. A drizzle of local honey at the end adds sweetness and shine.
This is one of those desserts that looks impressive but isn’t difficult. The dough comes together quickly, the apples need minimal prep, and the free-form shape means you don’t need perfect technique – jagged edges and rustic folds are part of the appeal. The key is slicing the apples thin enough to be flexible, arranging them in a tight pattern, and baking until everything is deeply golden. This recipe is calibrated for high altitude baking at 7,000 feet and works well for elevations between 5,500 and 8,500 feet.
Apple Galette · Brisée Dough, Cinnamon, Local Honey
Ingredients
Method
- Cut the butter into 1/2-inch cubes. Break the cubes apart and place in a bowl or deli. Place in the freezer for now.
- Make your ice water by combining one cup of water and several ice cubes in a container. Set aside.
- In a large bowl or the bowl of a stand mixer, stir together the flour, sugar, and salt.
- Add the cold butter cubes. Using a pastry blender, your hands, or the paddle attachment of a stand mixer, cut the butter into the flour until the pieces are pea-sized and the flour turns to a sand-like texture. You still want some visible chunks of butter—they create flaky layers as the dough bakes.
- Pour the ice water all at once over the dough. Mix or stir until the dough begins to come together. It should look shaggy and rough, not smooth. Finish by hand so the dough doesn't get tough—you want it just barely holding together.
- Divide the dough into 310 gram portions. (There will some extra.) Shape each portion into an inch-thick disk and wrap tightly in plastic wrap. Refrigerate for at least 30 minutes, or up to 2 days. The dough needs to rest so the gluten relaxes and the butter stays cold.
- Preheat your oven to 375°F.
- Cut the butter for the filling into ½-inch cubes. Set aside
- In a small bowl, mix the first measurement of sugar (25 grams) with the cinnamon, cloves, and nutmeg. Set aside.
- Cut the apples in half down the center. Core them and slice into thin slices, about 1/16 to 1/8 inch thick. A mandoline or very sharp knife works best. The thinner the slices, the more flexible they’ll be for arranging in the rose pattern.
- Place the apple slices in a large sauté pan with the cubes of butter, the second measurement of sugar (, and the apple cider vinegar. Cook over medium heat for 5-10 minutes, stirring occasionally, until the apples are soft and semi-flexible but not totally cooked. You want them pliable enough to bend and arrange, but not mushy.
- This pre-cooking does two things: it evaporates some of the water out of the apples so they shrink before assembly (making the crust fuller after baking), and it makes them flexible for arranging in a tight pattern where some slices get curved or twisted.
- Drain the apples and catch the syrup. Let the apples cool until safe to touch. Reserve the syrup for drizzling over the galette later.
- Remove one disk of dough from the refrigerator. Let it sit for 5-10 minutes at room temperature if it’s very hard – you want it cold but not rock-hard.
- On a lightly floured surface, roll the dough into a rough 12 inch circle, about ⅛ inch thick. The dough doesn't need to be a perfect circle – rustic and slightly irregular is the aesthetic. Mend any cracks by pressing the dough back together. If the dough becomes tough and springs back when you try to roll it, place it on a parchment-lined sheet pan and refrigerate for 10-15 minutes to relax, then continue rolling.
- Transfer the rolled dough to a parchment-lined baking sheet. If you’re making both galettes, repeat with the second disk of dough. Store the rolled dough in the refrigerator until 10 minutes before assembly.
- Pull your dough from the fridge. Make sure the dough is on a parchment-lined baking sheet.
- Using an 8-inch round cake pan or pie pan, make a light impression in the center of your dough as a guide. This shows you where to keep the apples—you want them within an 8-inch diameter circle in the center.
- Arrange the apples in a rose pattern: Start from the outer edge of the 8-inch circle. Lay apple slices touching end to end to form the outer ring.
- For your second circle, lay it directly on top of the first circle—each slice should slightly overlap the previous one. Offset the slices so they don't line up perfectly with the outer circle—this creates a spiral effect. Continue working your way toward the center in concentric circles, overlapping each new circle slightly inward.
- As you get closer to the center, the circles get smaller. Your second-to-last circle will be made of two slices overlapping in a yin-and-yang pattern. Your final slice in the very center should be twisted into a tight spiral to finish the rose.
- The apples will continue to shrink as they cook. Use any remaining apple slices to fill in any spaces you see, making new circles between existing ones if needed. You want the pattern nearly standing up with apples packed tightly. Stuff in as many apples as possible—the tighter the better.
- Drizzle the reserved apple syrup from the sauté pan over the arranged apples.
- Dust the apples with the cinnamon-sugar mixture you prepared earlier.
- Fold up the dough edges around the apples, pleating them 7-8 times evenly as you go around. The pleats should overlap slightly and create a rustic border around the fruit. Your raw assembled galette should be roughly 9 inches across.
- Brush the top of the dough with egg wash. Sprinkle the dough with coarse sugar or demerara sugar for crunch and sparkle.
- Chill the galette in the refrigerator for 20 minutes before baking if you have time—this helps the butter stay cold and creates flakier layers. Place the baking sheet in the preheated 375°F oven.
- Bake for 28 minutes, until the crust is golden brown and the filling is bubbling. Check the galette around 20 minutes—if the top of the crust is getting dark before the bottom is done, lay a piece of aluminum foil loosely over the exposed crust to insulate it and prevent burning.
- The galette is done when the bottom of the crust is golden brown and the filling is bubbling. You can gently lift the edge with a spatula to peek underneath and check.
- Remove the galette from the oven and let it rest for 10-15 minutes. This allows the filling to set slightly and makes it easier to slice.
- While still warm, drizzle fresh local honey generously over the top of the galette. The honey adds sweetness, shine, and a floral note that complements the spiced apples.
- Serve at room temperature. Cut into wedges and serve as is, or with vanilla ice cream if desired.


