
Pickled Vegetables Two Ways (Quick & French Traditional)
This is how you pickle vegetables—both ways. Quick pickles when you want crisp, tangy vegetables in 24 hours with zero fuss. French traditional pickles when you want shelf-stable jars that look and taste like you know what you’re doing.
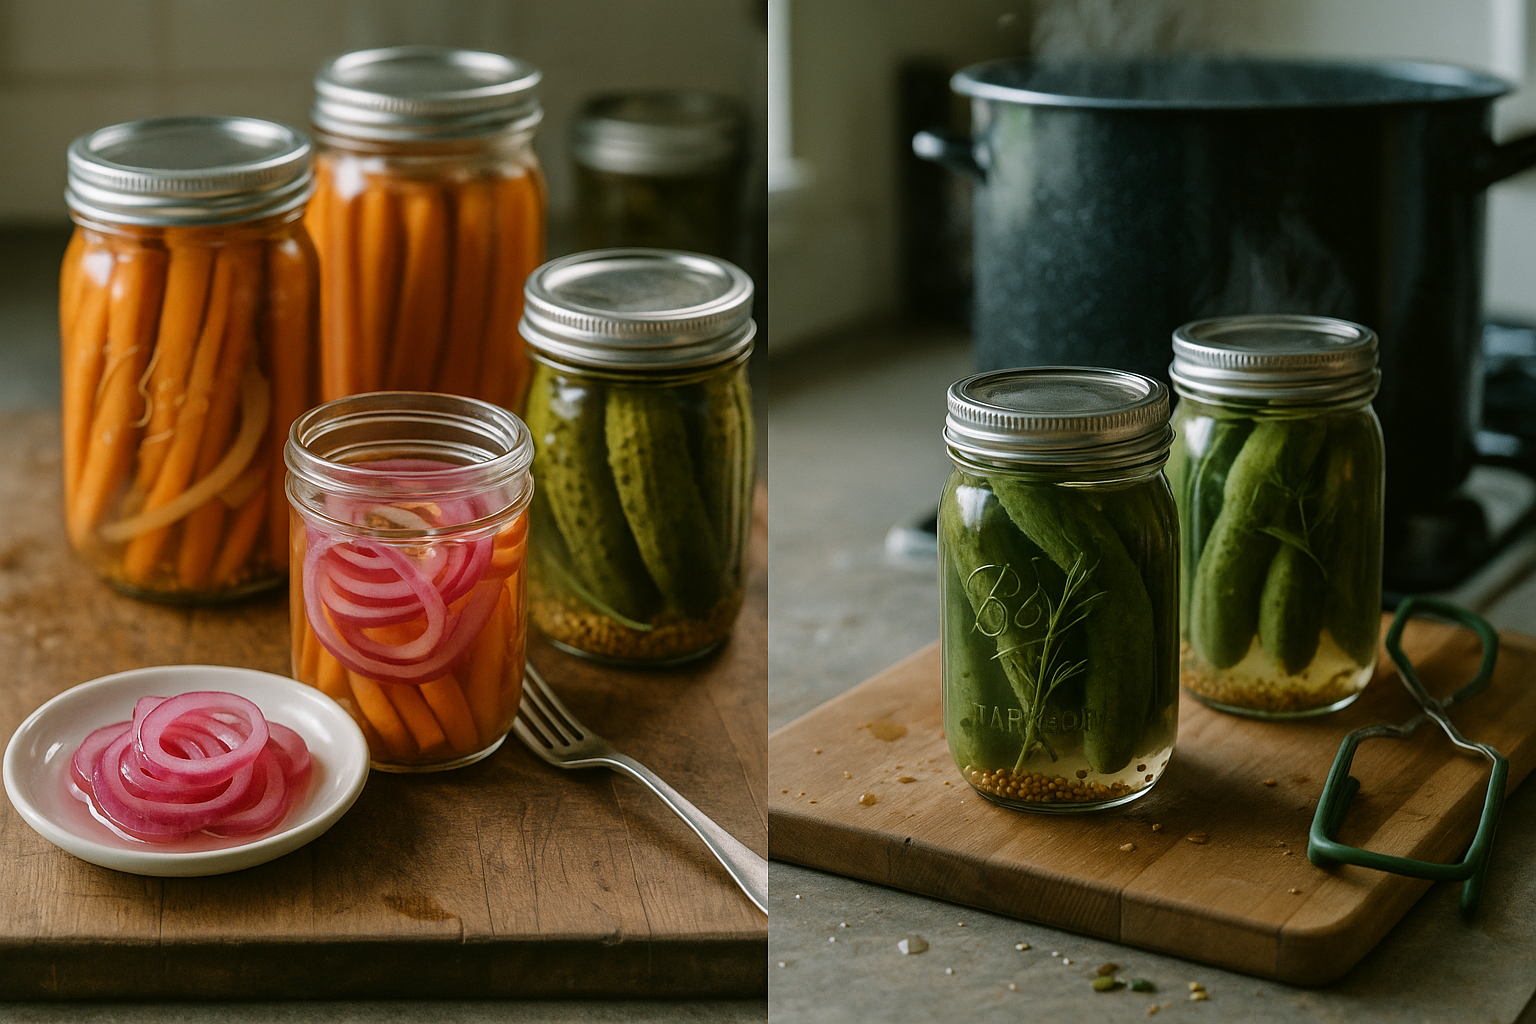
Both methods use the same vegetables, the same wide-mouth pint Mason jars. The difference is technique and time. Quick pickles live in your refrigerator and are ready tomorrow. French pickles get water bath processing and live in your pantry for months.
Quick pickles use apple cider vinegar—sharp, fruity, American. The brine is hot, you pour it over raw vegetables, refrigerate overnight. Done. French pickles use white wine vinegar or champagne vinegar—clean, elegant, refined. The technique involves proper canning lids, water bath processing, and aromatics like tarragon and white peppercorns. They’re shelf-stable, gift-worthy, and taste like you studied in France.
Red onions, carrots, cauliflower, radishes, turnips and cucumbers work year-round. Cut them into spears, coins, or chunks. Pack them into jars. Pour hot brine. Quick method goes straight to the fridge. French method gets water bath processing for shelf stability.
Both methods produce crisp, tangy pickles that make everything better. Sandwiches, cheese boards, salads, eaten straight from the jar at midnight.
Pickled Vegetables Two Ways (Quick & French Traditional)
Ingredients
Method
- Prep the Vegetables:Wash and cut your chosen vegetables into uniform pieces. For red onions, thinly slice using a mandoline for the best texture. For other vegetables, cut into spears, coins, rings, or bite-sized chunks. Pat them dry with a clean kitchen towel. Uniform size ensures even pickling and crisp texture.
- Pack the Jars: Divide vegetables among wide-mouth Mason jars—1 (16-oz) jar or 1-2 (10-oz) jars per recipe. Pack them snugly but not crushed—you want them tight enough that they don't float, loose enough that brine can circulate. Leave about 1/2 inch of space at the top (headspace). Add garlic cloves and peppercorns if using—tuck them around the vegetables.
- Make the Brine: Combine white vinegar, water, sugar (33g or 2 tablespoons + 2 teaspoons), and salt in a medium saucepan. Heat over medium heat, stirring until salt and sugar dissolve completely, about 1 minute. Once dissolved, remove from heat. Let cool slightly before pouring—this prevents the jars from cracking from thermal shock.
- Pour the Brine: Carefully pour the hot brine over the vegetables in the jars, covering them completely. The brine should come to within 1/4 inch of the rim. If you run short on brine, top off with a little hot water. Tap the jars gently on the counter to release any air bubbles trapped between vegetables.
- Cool and Refrigerate: Let the jars cool to room temperature on the counter, about 1 hour. Once cool, place lids on jars and transfer to the refrigerator. The pickles are ready to eat in 1 hour for very thinly sliced vegetables (like mandoline onions), or overnight for thicker cuts. They'll continue to improve over the next few days. Store refrigerated for up to 2 weeks.
- Sterilize the Jars:Wash 3 wide-mouth pint Mason jars, new canning lids, and rings in hot soapy water. Rinse well. Place jars upright in a large pot (your water bath canner). Fill the pot with water to cover jars by 1 inch. Bring to a boil and boil for 10 minutes to sterilize. Turn off heat and leave jars in the hot water until ready to fill. Place the new flat lids in a small saucepan of water, bring just to a simmer (not boiling), then turn off heat and leave them in the hot water. This softens the rubber seal. Keep everything hot until you're ready to fill the jars.
- Prep the Vegetables:Wash and cut your chosen vegetables into uniform pieces—spears, coins, rings, or bite-sized chunks. Pat them dry. Uniform size ensures even pickling and proper heat penetration during processing.
- Pack the Jars:Using jar lifter or tongs, remove one hot sterilized jar from the water. Pour out the water. Divide the garlic, shallots, white peppercorns, mustard seeds, tarragon sprigs, bay leaves, and coriander seeds among the 3 jars first—these go on the bottom. Then pack in the vegetables snugly but not crushed. Leave 1/2 inch headspace at the top. This headspace is critical for proper vacuum seal formation.
- Make the Brine:Combine white wine vinegar, water, salt, and sugar in a medium saucepan. Bring to a boil over high heat, stirring until salt and sugar dissolve completely, about 3-4 minutes. Once boiling, remove from heat.
- Fill the Jars:Carefully ladle or pour the hot brine over the vegetables, covering them completely. Maintain 1/2 inch headspace—measure from the rim down. If you run short on brine, top off with boiling water. Run a clean chopstick or plastic spatula around the inside of each jar to release air bubbles. Wipe the jar rims clean and dry with a damp cloth—any food particles or moisture prevent proper sealing.
- Seal the Jars:Remove the flat lids from the hot water using tongs or a magnetic lid lifter. Place a lid on each jar, rubber seal side down. Screw on the rings until fingertip-tight—snug but not over-tightened. Over-tightening prevents air from escaping during processing and can cause seal failure.
- Process in Water Bath:Return the filled, sealed jars to the large pot of water (water bath canner). Make sure jars are covered by at least 1 inch of water. If needed, add more hot water. Bring the water to a full rolling boil over high heat. Once boiling, set a timer and process for 15 minutes at a full boil. Adjust time for altitude: add 5 minutes if you're above 3,000 feet elevation (Park City is at 7,000 feet, so process for 20 minutes total). Keep the water at a rolling boil the entire time.
- Cool the Jars:Turn off heat. Using jar lifter, carefully remove jars from the water bath and place them on a clean kitchen towel on the counter. Don't tilt the jars. Leave at least 1 inch of space between jars. Don't touch the lids or move the jars. Let them cool completely at room temperature for 12-24 hours. You'll hear the lids "pop" and ping as they seal—this is the vacuum forming. It's the best sound in canning.
- Check the Seals:After 12-24 hours, check each jar for a proper seal. Press down on the center of each lid. If it doesn't move or flex, it's sealed. If it pops up and down, it didn't seal. Sealed jars can go into the pantry. Unsealed jars go straight to the refrigerator and must be eaten within 3 months—they're still safe, just not shelf-stable.
- Label and Store:Remove the rings (they can rust in storage), wipe the jars clean, and label with contents and date. Store sealed jars in a cool, dark pantry for up to 1 year. Once opened, refrigerate and use within 3 months.
Notes
Cook Time: 10 minutes + 15-20 minutes water bath (French method only)
Ready Time: 24 hours (Quick) or 1 week (French—they need time to develop flavor)
Total Time: 25 minutes (Quick) or 45 minutes (French) Why Two Methods:
- Quick Method: Use when you want pickles fast, you have refrigerator space, and you’ll eat them within 2-3 months. No special equipment needed beyond jars and lids. Vegetables stay slightly crisper. Less fuss. Perfect for weeknight prep.
- French Method: Use when you want shelf-stable pickles for your pantry, you’re making gifts, or you have a surplus of vegetables to preserve. Requires water bath canning equipment and new canning lids. More refined flavor with French aromatics. Can store for a year. Worth the extra effort for long-term storage.
Pint jars (16 oz) are ideal for pickles. They hold 1 1/2 to 2 cups of vegetables—a good portion size. Wide-mouth jars make it easier to pack vegetables and remove them later. They also process faster than quart jars in the water bath. If you only have regular-mouth jars, they work fine—just harder to pack. Canning Lids vs Regular Lids:
- Quick Method: Use any Mason jar lid—reusable plastic storage lids, metal lids with rings, doesn’t matter. You’re just covering the jar for refrigerator storage.
- French Method: Must use NEW two-piece metal canning lids (flat lid with rubber seal + metal ring). The rubber seal is designed for one-time use. After processing, it forms a vacuum seal that makes the jars shelf-stable. Don’t reuse old canning lids for water bath canning—the seal won’t work. You can reuse the metal rings, but always use a new flat lid.
Best vegetables for pickling are firm, dense vegetables that hold up to vinegar and heat:
- Excellent: Cucumbers, carrots, red onions, cauliflower, radishes, green beans, turnips, beets
- Good: Cabbage (for quick pickles only), asparagus, bell peppers, jalapeños
- Avoid: Leafy greens, tomatoes (too soft), zucchini (gets mushy), eggplant (absorbs too much liquid)
Cut vegetables into uniform pieces so they pickle evenly. Spears work well for carrots and cucumbers. Coins work for radishes and carrots. Florets for cauliflower. Rings or half-moons for onions. Keep pieces fairly thick (1/4 inch minimum)—thin pieces get soggy. Thick pieces stay crisp. Vinegar Matters:
- Apple Cider Vinegar (Quick Method): Sharp, fruity, slightly sweet. American-style pickling. Gives pickles a golden color and bold flavor. Use raw unfiltered apple cider vinegar for best flavor, but filtered works fine.
- White Wine Vinegar or Champagne Vinegar (French Method): Clean, elegant, refined. Classic French pickling. Gives pickles a pale color and delicate flavor. Don’t substitute red wine vinegar—too strong and turns everything purple. Champagne vinegar is ideal but expensive. White wine vinegar is perfect and more affordable.
- Both vinegars must be at least 5% acidity for safe pickling. Check the label. Most store-bought vinegars are 5-6% acidity. Don’t use homemade vinegar or vinegar with unknown acidity—you need the acid for preservation and safety.
The vinegar-to-water ratio in these recipes is calculated for safe pickling. Don’t reduce the vinegar or increase the water. Less vinegar = higher pH = potential for bacterial growth and spoilage. The acid preserves the vegetables. Follow the ratios exactly. Salt Matters:
Use kosher salt or pickling salt. Don’t use iodized table salt—it contains anti-caking agents that make the brine cloudy and can affect flavor. Sea salt works but can also cloud the brine depending on mineral content. Kosher salt is your best bet—Diamond Crystal or Morton both work. If using Morton (which is denser), reduce salt slightly. Sugar is Optional:
Sugar balances the acid and rounds out the flavor. You can reduce sugar or omit it entirely for more tart, savory pickles. Don’t increase sugar—it can interfere with preservation in the French method. Pack Jars Firmly:
Vegetables should be snug in the jar so they don’t float to the top once you add brine. But don’t pack so tightly that brine can’t circulate. If vegetables float, tuck a small piece of cabbage leaf or a small jar insert under the lid to keep them submerged. Hot Brine is Critical:
The hot brine does two things: (1) it slightly softens the vegetables so they absorb the brine faster, and (2) in the French method, it heats the contents enough for proper vacuum seal formation during water bath processing. Never pour cold brine over vegetables for either method. Quick Method Ready Time:
Technically edible after 2 hours in the fridge, but flavors need 24 hours to penetrate. They’re best after 3 days. They’ll keep getting more flavorful for about 2 weeks, then plateau. Still good for 3 months, but peak flavor is weeks 1-4. French Method Ready Time:
Let sealed jars sit in the pantry for at least 1 week before opening. The flavors need time to develop and mellow. They’re even better after 1 month. The longer they sit (up to 1 year), the more complex the flavor. Once opened, refrigerate and use within 3 months. Water Bath Canning Basics:
Water bath canning uses boiling water to heat jars and create a vacuum seal. The boiling water kills bacteria and drives out air from the jars. As the jars cool, a vacuum forms and the lid seals. This makes the pickles shelf-stable. You need:
- A large pot deep enough to cover jars by 1 inch of water (a dedicated water bath canner is ideal but any large stockpot works)
- A jar lifter or canning tongs to safely remove hot jars
- A rack or towel on the bottom of the pot so jars don’t touch the bottom directly (prevents breakage)
Park City sits at approximately 7,000 feet. At high altitude, water boils at a lower temperature, so you need longer processing time to ensure safety. Add 5 minutes of processing time for every 3,000 feet above sea level. For Park City, process jars for 20 minutes instead of 15 minutes. Checking Seals:
A proper seal is critical for shelf stability. After jars cool completely (12-24 hours), check each lid:
- Press down on the center of the lid. It should be firm and not flex or pop.
- Look at the lid from the side. It should be slightly concave (curved down in the center).
- Try to lift the lid with your fingertips (don’t use the ring). A sealed lid won’t budge.
After jars seal, remove the metal rings before storage. Rings can rust if moisture is trapped underneath. Also, rings can hide a failed seal—if the ring is holding the lid on, you won’t know if the vacuum seal failed. A properly sealed lid doesn’t need the ring to stay on. Store rings separately and reuse them. Storing Sealed Jars:
Store sealed jars in a cool, dark, dry place—pantry, basement, cupboard. Ideal temperature is 50-70°F. Avoid storing in hot areas (near the stove) or sunny areas (direct sunlight fades color and degrades flavor). Properly sealed and stored pickles last 1 year. After 1 year, they’re still safe but quality declines—they get softer and lose flavor. Once Opened:
Once you open a jar of French pickles, they’re no longer shelf-stable. Refrigerate and use within 3 months. Always use a clean fork or spoon to remove pickles—never use your hands or a utensil that touched other food. This prevents contamination. Food Safety:
The vinegar, salt, and heat (in the French method) preserve the vegetables and prevent bacterial growth. As long as you follow the recipe exactly—correct vinegar-to-water ratio, proper processing time, good seal—these pickles are completely safe. Signs of spoilage: bulging lids, broken seals, mold, off smell, sliminess. If you see any of these, discard the jar immediately. Don’t taste it. Common Mistakes:
- Using old canning lids (French method)—they won’t seal
- Under-processing in the water bath—jars won’t seal or pickles spoil
- Over-tightening rings—prevents air from escaping during processing
- Not leaving proper headspace—jars don’t seal
- Reducing vinegar—creates unsafe pH for preservation
- Not sterilizing jars (French method)—introduces bacteria
- Storing jars before they’ve fully cooled—can break seals
Both brines are customizable. Add or swap spices to taste:
- Dill seeds or fresh dill for classic dill pickles
- Extra garlic for garlic pickles
- Whole dried chilies for spicy pickles
- Fennel seeds for anise flavor
- Clove, allspice, or cinnamon for warm spice pickles
- Ginger slices for Asian-style pickles
It’s worth making multiple jars at once since the effort is the same. Double or triple the brine recipe. You can pickle different vegetables in separate jars using the same brine. Carrots in one jar, onions in another, cauliflower in a third. Same brine, different vegetables. Vegetables Pickle at Different Rates:
Denser vegetables (carrots, turnips) take longer to pickle than softer vegetables (cucumbers, radishes). They’re all edible at the same time, but denser vegetables improve more over time. Cucumbers and radishes are great after 24 hours. Carrots and turnips are better after 3-5 days. Gift-Worthy:
French method pickles make excellent gifts. They look professional, they’re shelf-stable, and they last a year. Add a ribbon and a handwritten label. Everyone loves homemade pickles. Make a batch in the fall, give them for the holidays. Using Pickles:
- Straight from the jar as a snack
- Cheese boards and charcuterie plates
- Sandwiches and burgers
- Chopped into salads
- Tartar sauce or relish
- Bloody Marys (pickled onions or carrots)
- Grain bowls and Buddha bowls
- Tacos and bánh mì
Don’t throw out the brine after you eat the pickles. Use it in:
- Salad dressings
- Marinades for meat
- Bloody Marys or dirty martinis
- Pickleback shots
- Reuse once to quick-pickle eggs or more vegetables (refrigerator only, not shelf-stable)
Store-bought pickles are usually packed with preservatives, artificial colors, and too much salt. They cost $5-8 per jar. Homemade pickles cost about $2 per jar in ingredients and you control everything—salt level, spice mix, vegetable quality, no artificial anything. Once you taste homemade pickles, store-bought tastes flat and chemical. Professional Technique:
Quick pickling is a staple technique in professional kitchens—every restaurant pickles their own vegetables for garnishes, salads, and composed plates. French canning technique is traditional preservation done for centuries in French farmhouses. Master both methods and you have fresh pickles year-round and pantry staples that last.


